Wednesday, January 13, 2021

How to save the Current Cover page in Microsoft Word /Create custom cover pages in MS Word

 How to save the Current Cover page in Microsoft Word/ Create custom cover pages in MS Word

 Cover page

  • Use this option to insert a fully formatted cover page.
  • The cover page automatically inserted in the first page of the document.
  • Here you can fill the title, author name, date and other information.
Process

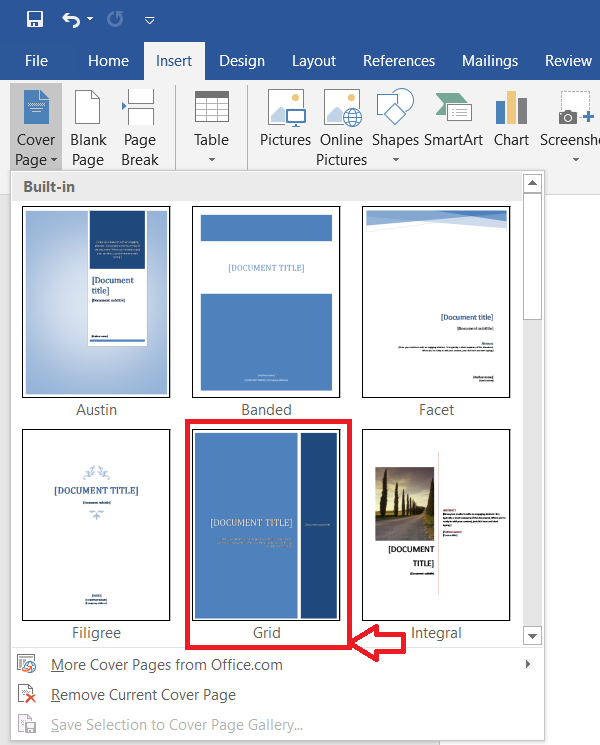
  • Go to insert tab ➤ pages group ➤ cover page. 


  • Select any cover page. 
        Ex- Grid.


  • Now the cover page inserted in document area.
  • Here you can change the cover page title,  Subtitle, date, author name or other in format.


How to formatting the cover page?
Process
  • Select any part of the cover page area.
  • Go to Drawing tools format.
        Shape, style ➤ choose any style.
        Shape fill   ➤choose any color.


You can change the theme style here.
Drawing tools ➤ Format ➤ Shape Styles  ➤ Theme Styles  ➤ Select any theme style.


Shape fill ➤ picture ➤ choose any picture ➤double click.


To add any picture click on Picture ➤ Click on Browse from a file


Browse ➤ Select any picture from your folder  ➤ Click on Insert.


        Here you can add any gradient here.
  Shape fill ➤ Gradient ➤ More gradient


More gradients  ➤ Format shape ➤ Expand the Fill option  ➤Gradient fill ➤ Preset gradients ➤ Choose any gradient style


         Under format shape expand the Fill option. You also found some other formatting options like, type , direction, angle, gradient stops, color, position, transparency, brightness.


        Under format shape option expand the Line ➤ Solid line
Here you change the color, transparency, width,  compound type, Dash type, cap type, join type.


        Shape fill ➤ Texture


        Shape outline ➤ Here you add a outline color. Under more outline color you can also add some more colors for outline.


Click on more outline colors ➤ select standard for more colors for outline ➤ choose any color ➤ click on OK.


For more outline colors you can choose custom under more outline colors.
More outline colors ➤ click on custom ➤ select any color from the color pallet (you can also change the color model)  ➤ click on OK.


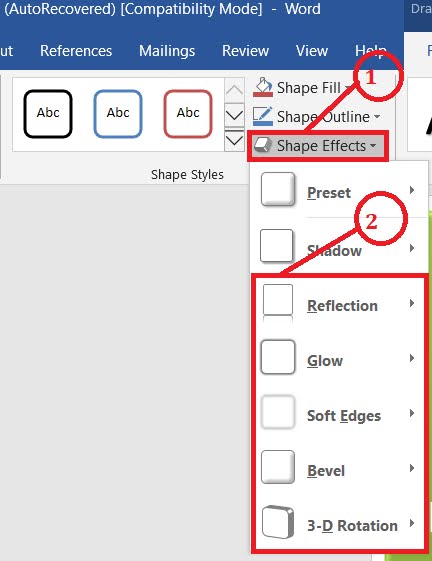
You can also change the  shape effects 
Click on shape effects ➤ Select preset ➤ Select any preset shape option.


Here you can add shadow effect from Shape effects
Click on Shadow effects ➤ click on Shadow ➤ click on any shadow effect.


Here you can add some other options like reflection, glow, soft edges, bevel, 3-D Rotation.


        How to save the current cover page?
        Process
  • Press Ctrl+ A to select the total cover page.
  • Cover page option.
  • Shape selection to cover page gallery.


  Name: office ➤ Ok


  • Go to cover page option.
  • Remove current cover page.


  • Now the cover page save in cover page gallery.
Here is a video from my You Tube channel on cover page๐Ÿ‘‡


Friday, January 8, 2021

Hyperlink between two files

 Hyperlink between two files

        Insert a hyperlink in a Word document to link to another location like a file or any  program. Generally this option is used for link between two files.

        A hyperlink is a word or phase or image that you can click on to jump to a new document or a new section with in the current document.

        Hyperlinks are found in nearly all web pages, allowing users to click their way from page to page.

How to identify the hyperlink?

        Text hyperlinks are often blue and underlined. When you move the cursor over a hyperlink weather it is text or an image, the arrows should change to a small hand pointing at the link, when you click on it, a new page will open.

Hyperlink between two files

1. First create a folder in desktop area, then give a name link.

     Here a file created with name Hyperlink in desktop area.


2. Then create two different files such as file1 and file 2.

Ex: File1

  • Type click here to see students record.
  • Then save file with name file1 in the folder which you created in desktop area.


File 2

  • Create a students record.
  • Then save the file with name file2 in the folder which you created in desktop area.  


Close both the window of file1 and file2.

How to create Hyperlink

  • Open the folder link on desktop area.
  • Open the file1.
  • Select click here to see student record.
  • Go to links group.
  • Click on hyperlink option.
  • Select the file2.
  • Ok.


Now here you can see the selected text highlighted in blue color


  • When you move the cursor on that line, a message shown "Ctrl + Click" to follow link and a hand mark shown on that message.


  • Just click on that line by pressing Ctrl key.
  • Now the file2 automatically open on screen.


Hyperlink between text and image

  • Type "click here to see picture"
  • Then select it.
  • Click on hyperlink option.
  • Select any picture from library ➤ Picture ➤ Ok.
Here you see a hyperlink video from my YouTube channel๐Ÿ‘‡


Monday, January 4, 2021

Recording and running a macro

What is a macro?

        A macro is a series of commands and instructions that you group together as a single command to complete a task automatically. A macro saves your time by combining a series of actions into a single command. Macros are ideal for tasks you frequently perform. A macro is a series of command that is recorded so it can be played back or execute it later. 

Recording and running a macro

1. Click on View tab

2. Click on the down arrow⏷ of Macros.

3. Click on Record Macro.


4. Type a name for the macro (a macro name must begin with a letter and cannot contain spaces)

5. To enter a description type in this area.


6. Click on keyboard to assign a keyboard shortcut to the Macro.


The customize keyboard dialog box appears.

7. To specify a keyboard shortcut for the macro press and hold down the
Alt key as you press a letter or number key.

8. This area displays the word(unassigned)

If the word (unassigned) is not displayed the keyboard shortcut you specified is already assigned to another command. Press the Backspace key to delete the shortcut and then repeat step 7.

9. Click on Assign  button to assign the keyboard shortcut to your Macro.

10. Click on Close button to continue.


11. Perform the actions you want the Macro to include.

12. Here in this example a school name and address is inserted into the document.
12. Click on stop recording       when you have completed all the actions you want the Macro to include. Now you can run the macro.


Run a macro using a toolbar
1. Click on View tab in the Ribbon.
2. Click on the down arrow⮟ of macros.
3. Click on view macros.


Macros dialog box will appear. This area displays the available macros
4. Click on the name of the macro you want to run.
    This area displays a description of the macro you selected.
5. Click on run to run the macro.
    Word automatically performs the actions you recorded, when you run a macro.


Word automatically performs the actions you recorded, when you run a macro.


To run a macro using the keyboard shortcut
1. Point the insertion point where you want the results of the macro to appear.
2. Press the keyboard shortcut you assigned (Alt +D) to the macro.
    The macro performs the actions you recorded.


How to run a macro๐Ÿ‘‰


Bubble chart in Excel

  Bubble chart in Excel:           Bubble chart show the relationships between sets of values.          Bubble chart compare at least three ...