HOW TO INSERT TABLE IN MS WORD
When we insert a table in document area there are two types of table tool design tab appears on screen.
- Table tool design tab
- Table tool layout tab
- Go to insert tab ➤ table option.
- Choose automatic table option.
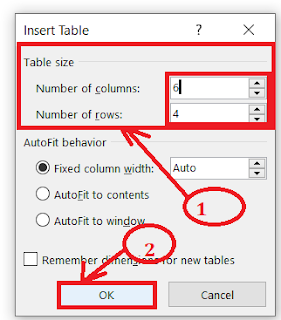
- Select number of rows and number of column and then click on the selected area.
- Apply it.
- Now table inserted in document area.
- Go to table tools layout ➤ Delete ➤ Delete table.
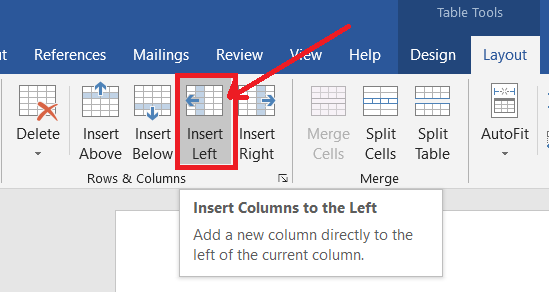
- Table tools ➤ Layout ➤ select any cell ➤ Rows & column group ➤click on insert above/ insert below/ insert left/ insert right which you want.
- You can delete the table here. Table tools ➤Layout ➤ Rows & column group ➤ Select delete.
No. of rows: 4
Ok
Process 3
- Go to table option
- Click on draw table option.
- Then click and drag to create table and to draw rows, columns and borders in document area.
Process 4
Process 5
Table tools design tab
Table style
- There are some predefined table styles are available in tables gallery including with colors and style.
- Select the tab
- Table tools design tab ➤ style group ➤ Table styles option
- Choose any table style.
- Apply it.
Table styles option
After apply table style then apply table style option.
There are 6 types of table options are available in table style group.
🗹Header row
🗹Total row
🗹Banded rows
🗹First column
🗹Last column
🗹Banded columns
Shading
Use this option to apply the shading of selected cell.
Border
Use this option to apply the border around the table.
- Choose any border type.
Here you can select any border style.
Tables tool layout tab
Select
By using the select option we can select current cell, row, column & entire table.
- Select cell
- Select row
- Select column
- Select table
- Select any cell, row or column(click on any cell/ row/column to select)
- Go to select option
- Choose any one of the below
Select row
Select column
Select table
Gridlines
Show or hide the gridlines with in the table.
Select the table.
Apply table styles from "design tab".
Then apply the "gridline" from table group.
Properties
Open the table properties dialog box to apply change advance table properties, such as indention & text wrap option or change the position of table alignment.
Process
- Create one paragraph and insert a table.
- Select the table.
- Click on properties option.
- Here you can move the table to left or right or center.
- Table properties dialog box open ➤ select left alignment/ center alignment/ right alignment ➤ Ok.
Draw table
Here you design your own table by drawing the cell, row and column borders. Even you can draw diagonal lines and cells within cells.
Go to table tools➤ layout ➤select draw table from draw group ➤ now draw your table.
Eraser
Remove specific borders in a table to create merged cells using table eraser option.
Go to table tools➤ layout➤ select eraser option from draw group➤ now apply it.
In this group we can insert extra row, column when necessary.
Insert rows above
Add a new row above the selected row.
Insert rows below
Add a new row below the selected row.
Insert columns left
Add a new column left of the selected.
Insert columns right
Add a new column right of the selected column.
Delete
By using the delete option we can delete the selected row, column, cell and total table.
Select any row/ column/cell/table.
Merge group
Merge cell
Merge the multiple selected cells & then convert to one cell.
- Select multiple cell.
- Go to layout ➤merge group ➤select merge cell option.
- Apply merge cell option.
Split the selected cell convert in multiple new cell.
- Select any cell.
- Click on split cell ➤ split cell dialog box open ➤ Choose number of rows and number of columns ➤ click on Ok.
Split table
Split the table divided into 2 tables.
Cell size group
Auto fit
Automatically resize the column width based on the size of the text in them.
Resize the columns in your table automatically.
Set your columns to be the same width as your content or choose for your table to stretch across the page.
- Auto fit content.
- Auto fit window.
- Fixed column width.
Distribute the height of the selected rows equally between them.
Go to table tools ➤ layout➤ select any cell ➤select table row height ➤ apply it.
Distribute columns
Distribute the width of the selected columns equally between them.
Go to table tools ➤ layout➤ select any cell ➤select table column width from cell size➤ apply it.
Alignment group
There are 9 types of cell alignment available in alignment group.
- Align top left.
- Align top center.
- Align top right.
- Align center left.
- Align center.
- Align center right.
- Align bottom left.
- Align bottom center.
- Align bottom right.
Text direction
This option is used to change the text direction within the selected cell.
Select any cell where you enter any text➤ Click on the text direction option for multiple times➤ Apply it.
Cell margin
Use this option to give a cell margin in top, bottom, left & right.
Data tab group
Sort
Sorting the records alphabetic & numerical data in ascending & descending order.
Select the list you want to sort.
Repeat header row
Repeat the first row data from table display on every first row on every page.
Ex: Insert a table with number of column 4 & number of rows 100.
- Select the first row with data.
- Then click on repeats headers row.
- Now you can notice on table the first row heading display in every page of table.
This option is used for convert to the tables in regular text. The text is visible but the table is not visible.
- Select the table with data.
- Click on convert to text option.
- Choose a tab.
Formula is very useful option in table. This option provides us to perform simple calculation such as Sum, Max, Min & Average.
- Put the cursor in result cell of your table ➤ Go to table tools➤ layout➤ go to formula option from data tab
- Formula dialog box open.
Note:
Other formulas are
=MAX(LEFT)
=MIN(LEFT)
=AVERAGE(LEFT)
=PRODUCT(LEFT)


No comments:
Post a Comment